Read Time: 16 minutes
Welcome to Model Railway Techniques. In this article we are going to go over some of the basic Model Railroad Design ideas and shapes for the small to medium sized Model Railroad, and why you should consider each of them when you are first in the design stages of your Model Railroad. We will also briefly talk about the various locations you can build your Model Railroad, and how those will impact your layout design. These initial design steps, when carefully considered and thought through, will save you time, money, and frustration in the future.
I highly recommend the following book, Track Planning For Realistic Operation by John Armstrong. In it he describes in more detail the essentials of planning your track plan, and what will and will not fit in a given area.
Having a plan is one of the most important aspects when planning your layout, whether you are a complete beginner, or an experienced Model Railroader considering a new layout idea or location. Follow along below to become familiar with the different Model Railroad Shapes and considerations on where you can build your Model Railroad, and how they both can have an effect on your Model Railroading pleasure.
DECIDING ON WHERE TO BUILD YOUR MODEL RAILROAD
A QUICK OVERVIEW OF THE DIFFERENT MODEL RAILROAD LAYOUT TYPES
FREE-STANDING LAYOUTS
SHELF STYLE LAYOUTS
THE DONUT
AROUND THE WALLS
THE WALK ALONG LAYOUT AND THE DOUBLE DECK LAYOUT
DECIDING ON WHERE TO BUILD YOUR MODEL RAILROAD
The first and most important thing to do when you are beginning to design your Model Railroad is to decide on where it’s going to be. There is no point designing a layout and track plan only to find it won’t fit in the area you have available. That would be just like the saying: “Don’t put the cart in front of the horse”. Depending on your individual situation, some popular options include:
- SHARED LIVING SPACE: Popular if there are no other options, your layout can be enjoyed by everyone and becomes a part of the area. Temperatures remain fairly constant. Downside is that it can be unsightly during construction, pets may be a problem, and you will have limited area to use for your layout due to dual space use.
- SPARE ROOM: A great option for a medium sized layout, you can keep unwanted pets out, and construction phases are not readily seen. Temperature is consistent. Downside is re-locating the layout in the future to a smaller area.
- BASEMENT OR ATTIC: Similar to the spare bedroom concept, you have a dedicated area for your layout. Downside is that these areas are often un-finished and temperature fluctuations as well as dirt and dust can become a real problem.
- GARAGE: One of the most popular for larger layouts, you again have a dedicated area for your layout. Downside is if the garage is still shared with vehicle access, then dirt and dust become a problem, and temperatures will vary also.
- OUTDOOR BUILDING: You have a dedicated space for your layout again, but considerations for temperature changes similar to the above scenarios need to be considered. Also, access, especially during inclement weather, may become bothersome and deter from your enjoyment.
Once you have an idea of where you’re going to build your Model Railroad, the next step is to decide on a general shape for it. From there you can decide on a theme and a track plan, or at least have an idea of what you can and can’t do within your given space. Remember, real railroads have many elements that make up their whole, and sometimes you have to compromise and not try to fit all of them in on a single layout. Expectations such as those will only lead to disappointment as you move further along in the process.
My advice is to start out with realistic goals and try to avoid including everything. You can always expand later, especially if you follow the advice in our Track Planning article coming in the future.
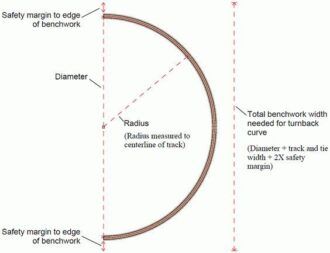
The Model Railroad Layout Shapes in the following illustrations are shown as each large square representing one foot. This is a common method used to get a good idea of the largest curves that will fit within a given area, and thus determines the minimum and maximum radius of your layout. There will be detailed discussion about this in our article on Track Planning, soon to come. As a brief description, reference the photo below. Assuming the benchwork width is 24″ and you plan on building in N-Scale, then the maximum radius available to use would be approximately 9″.
A QUICK OVERVIEW OF THE DIFFERENT MODEL RAILROAD LAYOUT TYPES
Model Railroads can be broken down into six basic design ideas, and each type has its advantages and disadvantages. For this article we will only go into depth on the first four, as the last two types are beyond the scope of this article and require much more detail and explanation. The six basic ideas are:
- FREE-STANDING LAYOUTS
- SHELF STYLE LAYOUTS
- DONUT STYLE LAYOUTS
- AROUND THE WALLS LAYOUTS
- WALK-ALONG LAYOUTS
- DOUBLE DECK LAYOUTS
FREE-STANDING LAYOUTS
In its simplest form, the basic Free-Standing layout usually represents a rectangle of some size. Popularized back in the day with the common plywood dimensions of 4×8 feet, this became the norm for many HO Scale layouts with either 18″ or 22″ radius curves. Today, with the wide availability of building supplies, tools, and knowledge, you no longer need to be constrained to a given size or shape.
Generally, a Free-Standing design gives access to all four sides of the layout, but the back and sides could consist of narrow aisles of 18″ or even 12″ used only for construction and maintenance. The main viewing area would be from the front in this case. Some Model Railroaders have even placed the legs on heavy duty casters to move it around for construction purposes.
The scale you model in is an important consideration in any layout design, and if you are considering building a Free-Standing rectangular or other shaped layout there is one important item you need to remember as mentioned earlier. This is the minimum radius, or in otherwards, how sharp your curves are. This becomes more of an issue as you move up to the larger scales of HO or O scale. Ideally you have already thought about this aspect as part of your theme decision, which dictates your operating equipment, and also the minimum radius for them.
Often times, though, you are only able to allow a certain amount of space for your Model Railroad, and as such, have to work with these constraints. This becomes doubly important if you’ve already invested in a scale or have items from the past you are reusing.
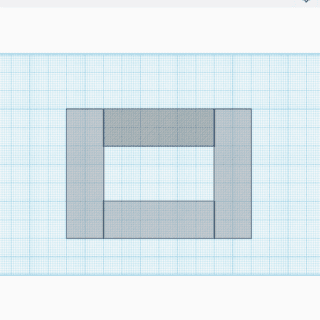
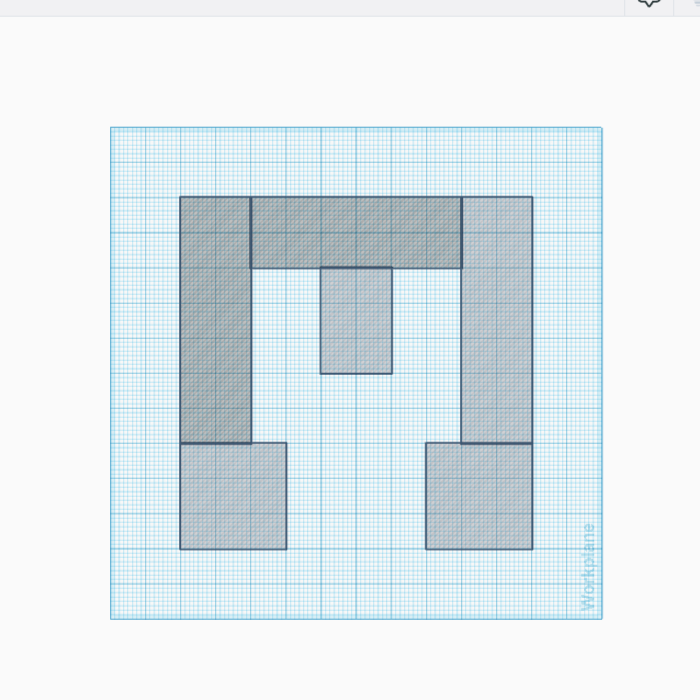
Below are three examples of Free-Standing layouts, the Basic Rectangle, the Classic Dog-Bone, and the U-Shaped or ‘Walk-in Style’.
SHELF STYLE LAYOUTS
The Shelf Style layout, as the name suggests, is built along one or more walls and can vary in depth from a mere 6″ up to 24″. The maximum depth of 24″ is based on the ability to reach comfortably to the backside of the layout during construction, or if the layout is complete, to be able to reach for required cleaning, maintenance, or the occasional re-railing of equipment without damaging elements in the front. This style is most often chosen when space is at an absolute premium in an area.
For those just starting out or others lacking space for a larger layout, this gives the Model Railroader the opportunity to build and operate a layout. While the narrow depth can be a challenge for adding certain scenic elements, there are a few ways around this as we’ll explore in an upcoming article. Many Model Railroaders choose this style of layout for either switching layouts, the practice of moving freight cars into and out of various industrial spur tracks for industries, or as Switch-Back logging or mining railroads. Both of these will be further explained in detail at a later date.
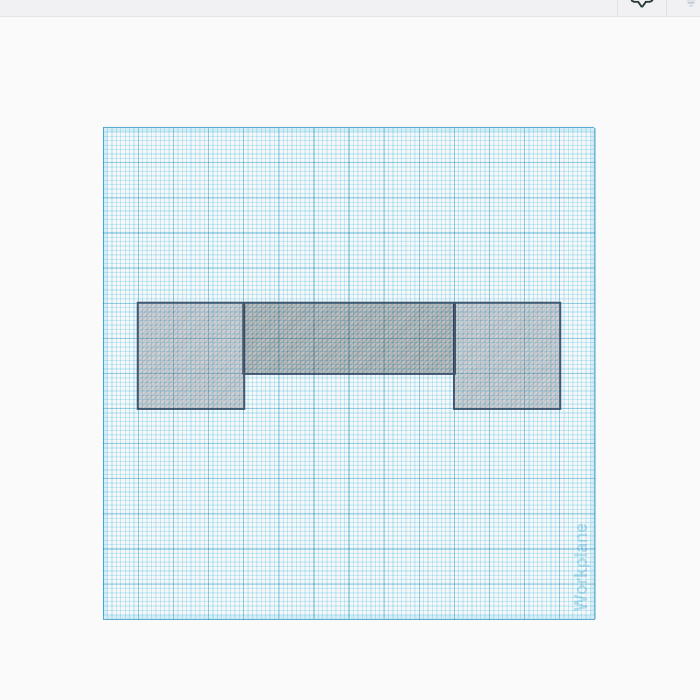
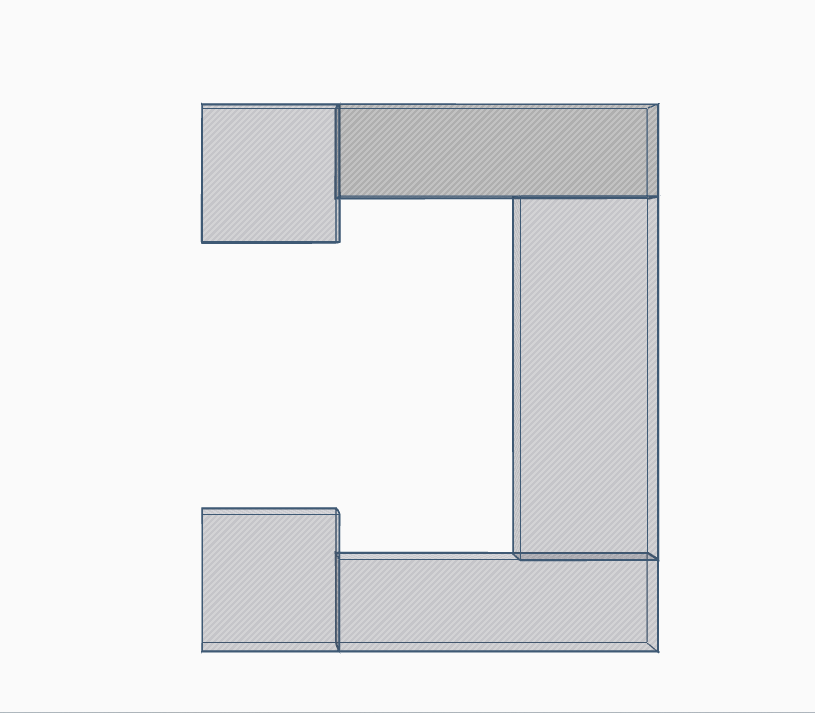
There is a variation of the Shelf Style layout that incorporates either one or two wider areas for loops of track. Usually located in the corners of the room that are not as useable anyway, they give the ability to add continuous running or return loops.
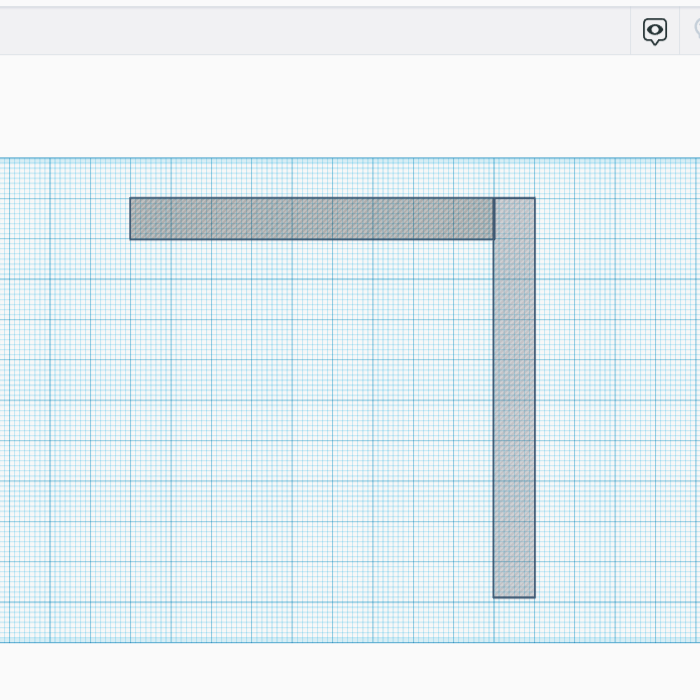
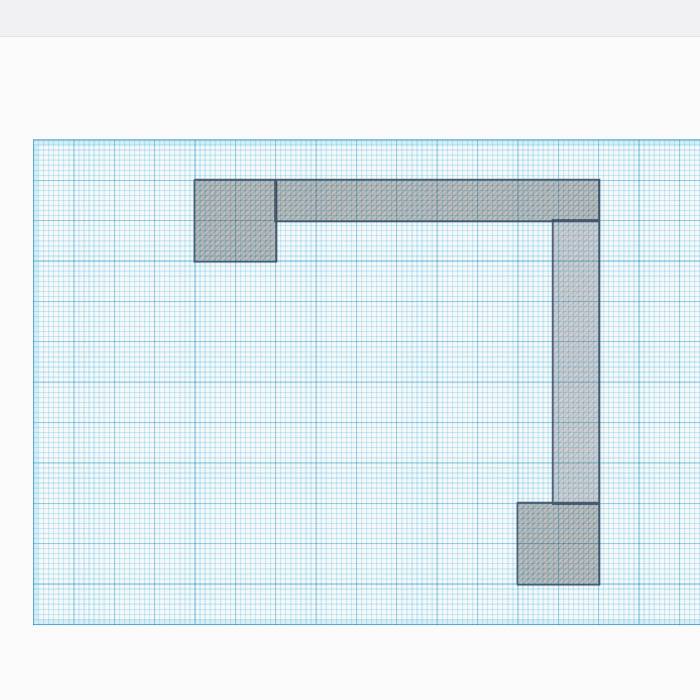
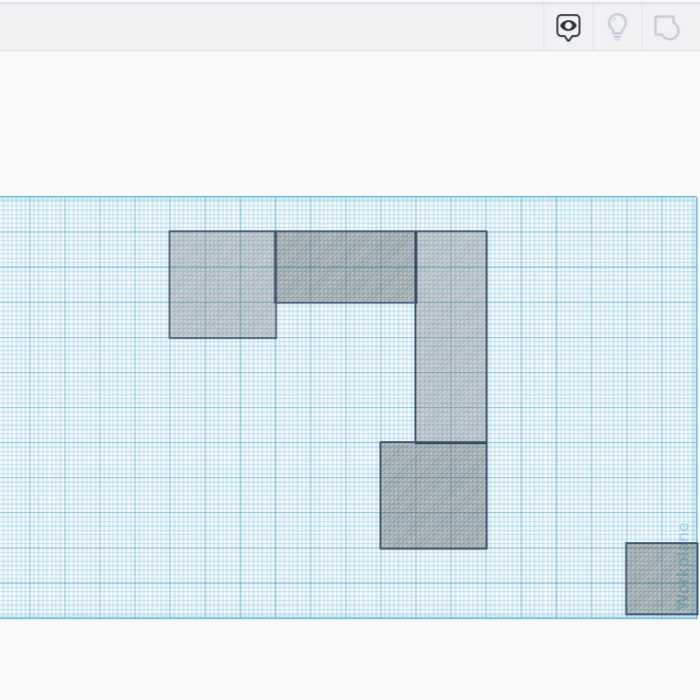
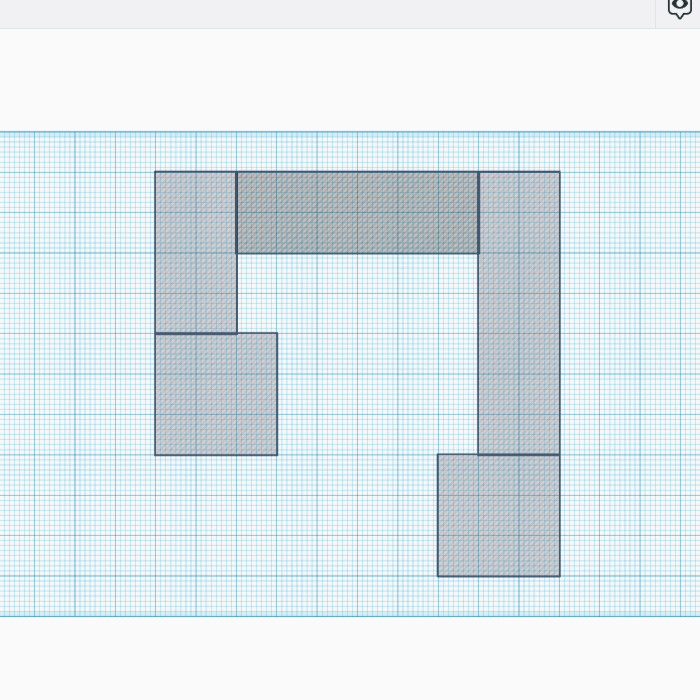
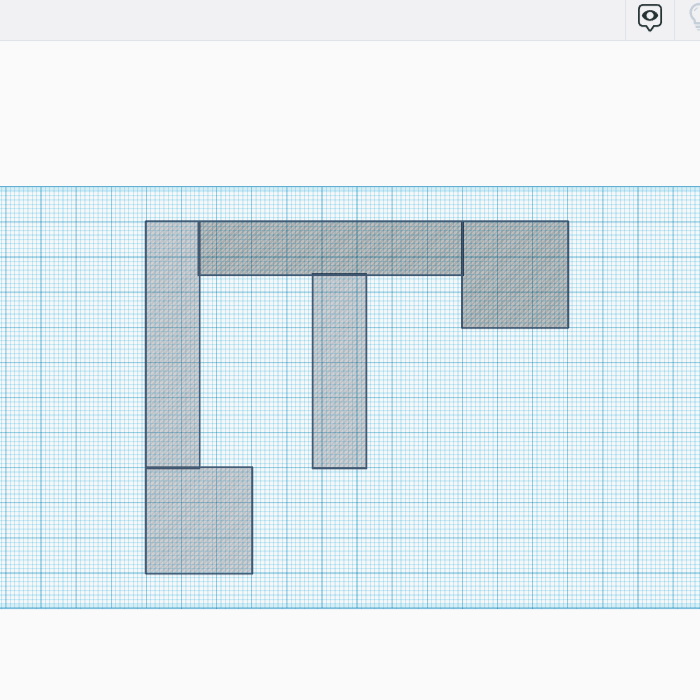
Below are three examples of Shelf Style layout shapes: The basic ‘L’ shelf layout, an ‘L’ shape with loops on each end, and a basic Shelf Style layout also with loops on each end. Note that the lengths can be suited for your situation, the ‘L’ shaped plans don’t necessarily have to extend into each corner for example. Or you could omit one loop etc.

THE DONUT
The Donut or ‘Pop Up’ layout type is another design that goes back a ways. It was first conceived as a way to incorporate larger radius curves in a given area, since essentially the four corners of this layout design are only a quarter circle. When built to an overall dimension of 7’x10′ as shown in the illustration, you are able to achieve a minimum radius of almost 24″ on the inner sides, and the radius on the outer sides will be equal or even greater than that.
It is a good choice for HO Scale, since most equipment will look best with 22″ radius curves or larger. In N or Z Scale, those radii of curve will allow you to operate even the largest modern Autoracks with absolutely no problems. With the emphasis on continuous running in this type of layout shape, it’s a good choice if you like to build scenery and watch your trains roll by. This plan is also suitable for O Scale with shorter equipment.
The one major drawback to this design is that you have to ‘duck-under’ to get to the central operating area, a factor to consider if you have back problems or other physical impairments.
AROUND THE WALLS
The next Model Railroad layout type we will discuss is the Around the Walls type. As you may have gathered, this layout shape is built around the walls of a room. It could be two, three, or even four walls, at which point it would become a Donut. And in some cases, such as large home layouts, can follow any kind of configuration.
These styles, in many Model Railroaders’ opinion’s, are the most realistic since they can offer long runs of mainline track with different towns, cities, or rural areas along their route just like the prototype railroads. Many of these larger home or club layouts evolve into the Walk-Along style since you are literally walking the length of these huge layouts.
For our purposes, the design shapes below are shown within a typical 10’x10′ room, which still offers plenty of potential. My own layout, as seen in the layout pictures I post, is located in a room just that size. The configurations shown can be lengthened, shortened, or re-arranged to suit your space. If built in segments as the illustrations suggest, you can arrange them however you want.
We have a great article titled How to Build Affordable Model Railroad Benchwork-Open Grid Method that I encourage you to read that would be perfect for building the different segments that comprise these types of layouts. The around the walls layout design definitely allows the most use of your given space and also allows you to keep all of your trains within sight. It offers good flexibility, especially in larger areas, and will allow you to achieve the largest radius possible, similar to the Donut style without the drawbacks.
The one disadvantage to any Around the Walls design is that if the layout ever needs to be re-located, then the general room or area configuration needs to be close. Also, if built in a spare room, for example, the new space would obviously need to be at least the same dimensions as the old room.
THE WALK ALONG LAYOUT AND THE DOUBLE DECK LAYOUT
As mentioned near the beginning of this article, both of these designs are beyond the basic layout design principles for small to medium sized layouts. However, we will give a brief description of both of them below.
A Walk-Along layout is normally a very large home or club layout that occupies a very large area. With the vast amount of space available, these types of layouts are typically stretched to their maximum length and width, and usually return back on themselves in long ‘U’ type configurations multiple times. Scenic backdrops divide each wide section, sometimes 6′ or more, into separate sides creating distinct scenes on either side of the viewing/operating aisles. These are truly life-long layouts when undertaken by an individual or even a club and take many hours to build.
Double Deck layouts are basically two layouts stacked on top of each other with either long grades to make the climb from one level to the next, or the use of a Helix, a series of loops stacked on top of each other that gain elevation. These types of layouts are complex, and there are complicated design ideas to consider when building these types of layouts. There has been a rise in popularity of double deck designs again since their inception back in the ’60’s, primarily by Model Railroaders trying to double their layout size in a given area as space becomes a premium in today’s world.


IN CONCLUSION
Remember, Model Railroading is a hobby that it is meant to bring you hours of fun and relaxing times. When designing and planning your Model Railroad, take the time to consider the points made up above. As a lifetime Model Railroader myself, I have built every version of the above layouts except the Double Deck design, and I have learned a lot along the way through trial and error. But I promise you that if you take your time and not rush into things, your rewards will be tenfold.
A few key points to remember:
- CHOOSE YOUR AREA FIRST
- DECIDE ON WHAT WILL FIT
- THEN DESIGN YOUR TRACK PLAN
By following the above advice, I am confident that you will be able to achieve the Model Railroad of your vision.
RELATED ARTICLES
Copyright 2023 Model Railway Techniques All Rights Reserved
If you enjoyed this post, please share and leave your comments below. Click the subscribe button in the bottom right corner to receive automatic updates of new posts. Your email is confidential and will NOT be shared or redistributed.
James, Model Railway Techniques.com
Last Updated on 2 years ago by James from Model Railway Techniques
Omg, this is so cute!! A miniature model railway.
This article is very detailed about the model building layout, and I have benefited a lot!
Although I don’t have such a professional railway model, I can give my nephew some advice when playing with train toys.
There are so many changes and considerations in the construction of railways.
thanks for sharing.
Thanks for stopping by and leaving a comment Winter. It would be great if your nephew took up the hobby, there are many great aspects to it that few people even realize, such as artistic expression, model building skills, imagination and more.
James, Model Railway Techniques.
Thanks for your thorough read on designing your model railroad.
You have covered different locations and how these will impact upon your design, providing a great saving of time, money and attention to ensure your time is not wasted.
I like how you have planning first. This is essential. Then the general shape, detailed layouts from the basic to the more complex. Your diagrams and attention to detail is very helpful.
Thanks for sharing your experience and expertise. You can clearly see that you have a lifetime of knowledge to share and that you wish to help others explore such a wonderful creative hobby as building a model railroad.
Thank you, Dale. The goal here at Model Railway Techniques definitely is to share the knowledge of Model Railroading with everyone who is interested in this fascinating hobby. All too often other articles on the subject either lack in sufficient clear information or make the information far more complicated and intimidating then necessary, turning away potential interested individuals. We’re happy you found the information clear and informative.
James, Model Railway Techniques.
When it comes to designing a model railroad, I believe that it is important to consider the size of your layout. As someone who has built both small and medium sized layouts, I can say that there are unique challenges and benefits to each. With a smaller layout, you may have less room for detail but can often fit in more track and scenery. On the other hand, with a medium sized layout, you have more space to work with but may need to prioritise which areas to focus on for detailing. My question would be: What are some key design elements that should be considered when building a small or medium sized layout?
Thanks for reading our article, Akumendoh, and also commenting. If you are designing a small Model Railroad, some key design elements would be: 1) A track plan to allow for a variety of operations. 2) A focused theme or era for your Model Railroad. 3) A minimum radius curve that is complimentary to your theme and equipment. 4) Scene composition. 5) The use of perspective and selective compression to make the layout appear larger. The use of very detailed areas throughout will add to the realism and is an important part of the scene composition above.
When designing a medium sized layout some key elements would include: 1) A free flowing track plan that allows for scenery both to the front, and to the back of the trackwork where possible. 2) The inclusion of passing or storage sidings if building a single-track mainline, or make the mainline double-track. 3) An area for staging trains, either hidden or visible. 4) Industrial spurs if you like way freight switching. 5) Variations in elevation of your scenery, and if desired, your trackwork also. 6) And again, the choice of a minimum radius that is complimentary to the type of equipment you plan to run based on your theme and/or era of your Model Railroad.
We have an article on Track Planning publishing in the next day or two, some of the above items will be described in a bit more detail, and each one will get its own full article in the future so keep checking back in.
James, Model Railway Techniques.
Most informative post I’ve read so far! It gave me some basic design ideas for the small to medium sized model railroad that I want to build. I learned how to decide where to place my track, how to create realistic scenery and how to operate my trains smoothly. The photos and diagrams were mostly helpful since I learn faster visually. Looking forward to more!
Thanks for the comment, Cezar, glad you found the article interesting and informative. We do have another article almost ready to publish giving some great ideas on actual track plans and how to even create your own track plan from scratch, so be sure to check back often.
James, Model Railway Techniques.